Window Flashing Requirements for Permitted Installations
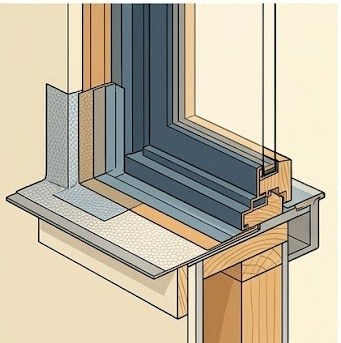
Flashing failures cause more window permit final inspection failures than any other single issue — and generate more water damage warranty callbacks in the years following installation. The reason is not that flashing is technically complex; it's that the consequences of improper flashing are delayed. A poorly flashed window may look fine for two or three years before water infiltration becomes visible, by which time the framing may already be compromised. Understanding correct flashing practice helps you verify your contractor is doing it right before the walls close up, and helps you understand what inspectors are looking for when they arrive for the final.
Why Window Flashing Exists and What It Does
A window frame and rough opening are never perfectly watertight at their interface. Even with proper caulking and installation, wind-driven rain at high velocity, temperature cycling that expands and contracts materials, and capillary action in wood grain all drive water toward the gap between frame and rough opening. Properly installed flashing creates a continuous drainage plane — a system of overlapping, sloped surfaces that intercept any water that enters and redirect it back outside before it can reach the framing, sheathing, or insulation.
Without flashing, water that enters the frame-to-rough-opening interface has nowhere to go except into the wall assembly. In a wood-framed wall, that means potential rot in the sill plate, king studs, and rim joist over time. In a masonry wall, it means moisture migration into the wall cavity and interior surfaces. The mold and structural damage that result from chronic water infiltration at windows are among the most expensive home repairs homeowners face — and they're almost entirely preventable with correct flashing installation.
The Four Flashing Components Every Window Needs
1. Sill Pan Flashing — The Most Critical Piece
The sill pan sits beneath the window, on the rough sill, and extends up the jambs several inches on each side. It is the most important single piece of the flashing assembly because it catches any water that penetrates the window frame-to-rough-opening interface and redirects it back outside.
Critical installation requirements:
- The sill pan must slope toward the exterior — even slightly sloped toward interior channels water directly into the wall
- Pan must have end dams at the sides to prevent water from running off the edges horizontally into the wall
- Weep holes or drainage gaps must be left at the exterior bottom edge to allow trapped water to exit
- Never caulk the exterior bottom of the window frame — those weep holes are intentional drainage paths
Materials: flexible self-adhering flashing tape (the most reliable for complex geometry), pre-formed PVC or metal sill pans, or liquid-applied flashing membranes. Flexible tape is the most commonly used product in residential construction and allows conforming to irregular rough sills.
2. Jamb Flashing — The Direction That Gets Reversed
Flexible flashing tape applied to the side jambs on each side of the rough opening. The most critical installation detail: jamb flashing must lap over the sill pan flashing at the bottom — not under it. If jamb flashing is installed under the sill pan, water running down the jamb gets directed under the sill pan and into the wall cavity rather than onto the pan's drainage surface. This single installation error reversed is responsible for a disproportionate share of window-related water damage claims.
At the top, jamb flashing laps behind the building wrap (water-resistive barrier) on the sides. The jamb flashing should extend at least 6 inches beyond the rough opening edges to create an adequate weather barrier integration zone.
3. Head Flashing — What Goes Above the Window
Head flashing is installed above the window to intercept water running down the wall surface above and divert it past the top of the window frame. The installation sequence is critical and frequently done in the wrong order:
- Correct: Head flashing is installed under the building wrap above it, so water running down the wrap sheet is directed onto the head flashing and over the window
- Incorrect (common): Head flashing installed on top of the building wrap above, creating a scoop that channels water behind the head flashing and into the rough opening
Self-adhering head flashing tape is the preferred product in most residential applications. Drip cap metal flashing above windows is an older approach that works when properly lapped under the siding and building wrap above.
4. Building Wrap Integration — The System Connector
Individual flashing components only work when properly integrated with the building's water-resistive barrier (WRB) — typically house wrap (Tyvek, Typar) or building paper. The WRB is the primary drainage plane for the entire wall; the window flashing connects the window opening to that system. The integration sequence for a WRB installation:
- WRB installed over sheathing with a horizontal cut at the sill (I-cut or Y-cut pattern)
- Sill pan flashing applied first, extending under the WRB fold-down
- Jamb flashing applied, lapping over sill pan at bottom, integrating with WRB at sides
- Window installed in rough opening with proper shimming
- Head flashing applied, lapping under WRB above
What Inspectors Check During Final Inspection
Building inspectors typically cannot see all flashing components after the window is installed and trim is in place — which is why scheduling the final inspection before interior and exterior trim is installed is best practice. What inspectors look for:
- Evidence of sill pan flashing visible at the sill (from interior access before trim)
- Head flashing or head flashing tape visible above window at the exterior
- Continuity of the flashing assembly — no visible gaps or uncovered transitions
- Exterior sealant applied at side jambs and head (but not at sill bottom)
- For Florida installations: anchor spacing and fastener size matching the FPA product approval document exactly — this is checked against the permit documentation
- Weep holes in the window frame not blocked by foam or caulk
The Most Common Flashing Failures and Their Consequences
| Failure | Consequence | How Common |
|---|---|---|
| Sill pan sloping toward interior | Water channeled into wall framing; rot and mold in 2–5 years | Moderately common |
| Jamb flashing installed under sill pan | Water directed under sill pan into wall cavity at sill | Very common |
| Head flashing on top of WRB instead of under | Head flashing acts as water scoop; severe infiltration at top of window | Common |
| Bottom of window caulked (weep holes blocked) | Water trapped in frame; glass seal failure; rot at sill plate | Very common |
| High-expansion foam bowing window frame | Window fails to operate; frame distortion; air infiltration | Moderate |
| Gaps in building wrap not taped at rough opening | Bulk water entry at window perimeter; widespread wall damage | Common in rushed installations |
| No sill pan — window set directly on rough sill | Direct water path into framing; immediate risk of damage | Uncommon in permitted work; more common in unpermitted |
Manufacturer Installation Instructions: Not Optional
Every major window manufacturer publishes specific installation instructions that include required flashing details and sequences. These instructions are not optional suggestions — following them is required to maintain the product warranty, and in Florida, required to comply with the Florida Product Approval installation method. Ask your contractor to show you the manufacturer installation guide for your specific windows and confirm their method matches it step by step. If they cannot produce the installation guide or don't know where to find it, that is a meaningful concern about installation quality.
The 15 questions for your contractor includes specific questions about flashing method that should be asked and answered before signing any contract.
Frequently Asked Questions
Without removing trim, you have limited visibility. Signs of flashing problems that become apparent over time: water stains or discoloration on interior drywall near window corners (especially lower corners), paint peeling at window edges, soft or spongy feel to drywall near window sills, condensation patterns that don't match other windows in the house. For a definitive answer on an existing installation, a moisture meter can detect elevated moisture levels in wall framing near the window without destructive opening — most home inspectors carry them and can perform this assessment.
No. Caulk is a maintenance material, not a flashing system. Caulk at window perimeters cracks, shrinks, and fails within 5–10 years under normal UV and temperature cycling. A properly installed flashing system uses physical drainage geometry — sloped surfaces and overlapping layers — that redirects water regardless of sealant condition. Caulk is applied as a supplement to a proper flashing assembly, not as a replacement for one. A contractor who proposes caulk-only waterproofing for window installation is not following current best practices or manufacturer requirements.
You can inspect the exterior perimeter from outside. Look for: continuous head flashing or self-adhering tape above the window integrated with siding/cladding, sealant at side jambs (but check that the bottom edge is not caulked — weep holes should be open), and no gaps visible at window-to-wall transitions. For a definitive assessment of the sill pan and jamb flashing, you would need to remove interior trim near the sill to inspect the rough opening flashing — something worth doing before a major water event if you have doubts about installation quality.